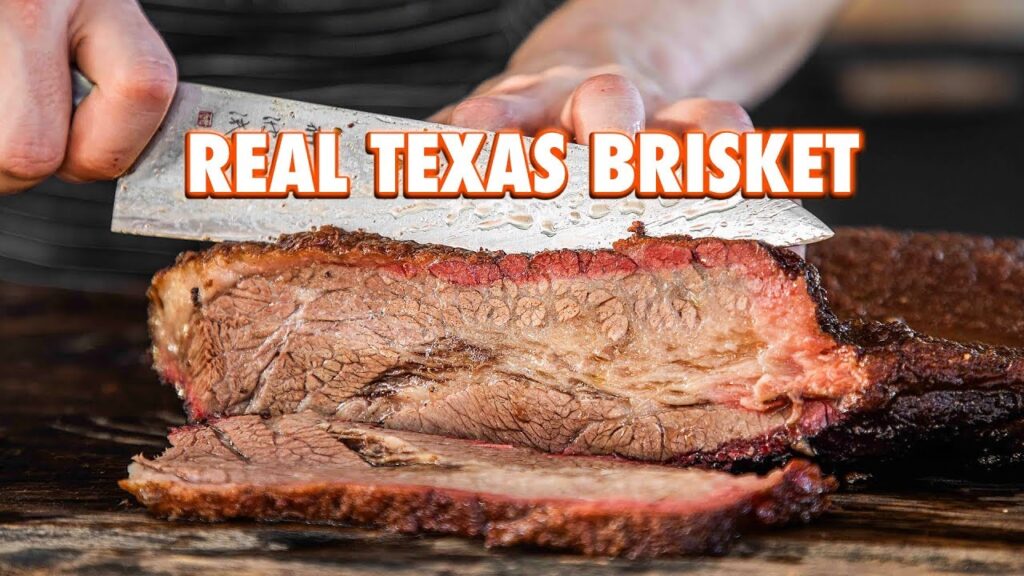
How To Make Texas smoked brisket Properly brings classic Texas smoke and melt-in-your-mouth tenderness to your backyard, guided by Joshua Weissman’s proven techniques. You’ll get a sense of the deep, beefy flavor, the prized smoke ring, and why this brisket is a benchmark for serious BBQ.
The article outlines exact ingredient measurements, step-by-step smoking instructions with specific temperatures and internal doneness targets, practical tips on wood choice and resting, and serving suggestions so you can plate and enjoy the finished brisket. Follow each section closely and you’ll be set to produce a truly memorable smoked brisket.
This image is property of i.ytimg.com.
Introduction
You’re about to learn how to make Texas smoked brisket properly, step by step, so you can get that classic bark, smoke ring, and melt-in-your-mouth tenderness at home. This article walks you through choosing and trimming the meat, making and applying a classic Texas rub, managing the long low-and-slow smoke, handling the stall, and finishing, resting, and slicing your brisket for service. The focus is practical, safety-minded, and aimed at helping you reproduce a great result the first few times you try.
Choosing the Brisket
Selecting the right cut: whole packer vs flat only and how that affects cooking
You have two main choices: buy a whole packer brisket (both the point and flat attached) or buy just the flat. A whole packer (often 10–16 lb) includes the fatty point muscle and the leaner flat; cooking the whole packer gives you both juicy, shreddable point and sliceable flat — and it’s the traditional choice for Texas brisket. The flat-only option (usually 4–7 lb) cooks a bit more predictably and yields uniform slices but lacks the richer, more marbled point. If you plan to serve a mix of sliced brisket and chopped burnt ends, get a whole packer. If you want consistent slices for sandwiches and smaller yields, the flat can be simpler.
Recognizing grade and marbling: USDA Prime, Choice, and Select considerations
Marbling matters: USDA Prime has the most intramuscular fat and will give you the juiciest result with a forgiving cook; Choice is a great compromise and common in stores; Select has less marbling and can dry out more easily. For brisket, pick the best marbling you can afford—look for visible flecks of fat through the muscle. If you must take a lower-grade brisket, plan for careful trimming and slightly earlier wrapping to preserve moisture.
Estimating weight per person and planning for yield and trimming loss
Plan for roughly 1 to 1.25 lb of raw brisket per person if you want generous portions and leftovers—brisket yields roughly 40–60% after trimming and cooking, depending on how much fat you remove and how much moisture is lost. A 12 lb whole packer typically feeds 8–12 people. Expect trimming loss of 10–20% (mostly hard fat and silverskin) and cooking loss of another 30–40%.
Inspecting for quality: fat cap thickness, silverskin, and visible connective tissue
Check for an even, not-too-thick fat cap (about 1/4–1/2 inch is ideal to protect and baste the meat but not insulate it so much it prevents smoke and heat penetration). Look for silverskin and pockets of tough white connective tissue; these you’ll remove during trimming. The brisket should have a firm texture and a fresh, clean color—avoid any off odors or slimy surfaces.
Buying tips: when to purchase and how to transport and store before cooking
Buy your brisket a day or two before cooking if possible. If you buy earlier, keep it refrigerated at 35–40°F in its original packaging or wrapped tightly. Transport in a cooler with ice packs to maintain temperature. If you buy well in advance, you can dry-age it in its packaging for a day or two in the fridge for concentration of flavor, but don’t leave it longer than 3–4 days. If it’s frozen, allow at least 48 hours thawing in the refrigerator for a large whole packer.
Ingredients List
Primary ingredient: whole beef brisket (specify point and flat components to list in final recipe)
- 1 whole packer brisket, 10–14 lb (contains the flat and the point; the flat is the lean, sliceable muscle, and the point is the fattier, more marbled muscle used for chopped or shredded portions)
Seasoning essentials to list: coarse kosher salt and coarse black pepper (specify types to use in final recipe)
- 1/3 cup coarse kosher salt (use Diamond Crystal if possible; if using Morton, reduce volume by ~20%)
- 1/3 cup coarse black pepper, coarsely cracked (freshly cracked whole peppercorns are preferred for texture)
Optional rub components and aromatics to include in the final recipe if used
- 2 tbsp garlic powder (optional)
- 2 tbsp onion powder (optional)
- 1–2 tbsp smoked paprika or sweet paprika (optional, for color and mild sweetness)
- 1 tsp cayenne or chipotle powder (optional, for heat)
- 1–2 tbsp brown sugar (optional; traditional Texas-style often avoids sugar, but some like it for crust balance)
Wood fuel choices to list for the recipe (e.g., post oak, oak, hickory, mesquite) and why
- Post oak or plain oak: classic Texas flavor, steady mild smoke, great for long cooks.
- Hickory: stronger, slightly sweet, use sparingly or mixed with oak for more smoke presence.
- Mesquite: very strong and fast-burning — use sparingly or for just part of the cook to avoid bitter flavors, or avoid on long cooks unless you prefer intense flavor. Choose a mild hardwood like post oak or red oak as your primary wood for an all-day brisket.
Optional additions to include in the ingredients section: mustard or binder, injections, finishing sauce (if applicable)
- 1/4 cup yellow mustard or neutral oil (as a binder to help the rub adhere; mustard won’t flavor the final product strongly)
- Optional injection for moisture: 1 cup beef broth + 2 tbsp Worcestershire + 1 tsp garlic powder (inject 6–8 hours before smoking if you want added internal flavor and moisture)
- Optional finishing sauce: light mop or sauce to serve on the side (Texas brisket is often served without heavy sauce; if you make barbecue sauce, serve on the side)
Trimming and Preparing the Brisket
Goals of trimming: even thickness, removing excess hard fat, leaving protective fat cap
Your trimming goals are to create an even cooking surface, remove hard, lumpy fat that won’t render, and leave a protective fat cap of about 1/4 inch where it will help baste the meat. You also want to remove silverskin and excess loose pieces so seasoning and smoke can penetrate evenly.
Step-by-step trimming tasks to describe in the article: removing silverskin, leveling the flat, shaping the point
Start with the brisket chilled—it’s easier to trim cold. Use a sharp, flexible boning knife. Remove large, hard, waxy fat deposits from the underside of the brisket and trim any heavy seams that won’t render. Peel away the silverskin and any tough membrane on the flat. Trim the fat cap to even thickness—1/4 inch across the surface is a good target. If one area of the flat is much thicker, level it by trimming so the flat and point lie relatively even for a uniform cook. Shape the point so it tucks neatly against the flat during the cook; you can create a gentle slope rather than abrupt peaks.
Techniques for making a uniform cook: thinning the thick areas and creating consistent thickness
Where the brisket is very bulbous, shave thin layers of fat or meat to reduce thickness differences; don’t over-trim the cap across the board—preserve some fat for flavor. Aim for consistent thickness to avoid undercooked centers or overcooked edges. Raising thinner portions on a small foil pad during smoking is another technique, but trimming is the most reliable.
Binder or surface prep: when to apply mustard or olive oil as a binder before the rub
Apply a thin coat of yellow mustard, neutral oil, or olive oil to the surface just before applying your rub. The binder helps seasonings stick and helps form the crust (bark). You don’t need much—use about 1/4 cup total and spread it evenly with your hands or a spatula.
Food-safety and handling notes while working with raw meat
Always work on a clean, sanitized surface and use a dedicated cutting board for raw meat. Wash hands frequently and don’t cross-contaminate utensils or plates. Keep the brisket refrigerated until you start prep, and if you use an injection syringe, sanitize it between uses. Discard any marinades or fluids that have been in contact with raw meat unless you cook them thoroughly.
This image is property of pixabay.com.
Preparing the Rub and Seasoning
Composition of a classic Texas-style rub to be detailed in the final recipe (basic components and variations)
A classic Texas-style rub is famously simple: coarse kosher salt and coarse black pepper in roughly equal parts. That’s the foundation. You can optionally add a little garlic powder and onion powder, and some cooks add paprika for color. Keep sugar minimal or absent if you want a true Texas-style bark that’s not too sweet.
Mixing and grinding salt and pepper for optimal texture and adhesion
If you buy whole black peppercorns, crack them coarsely with a spice grinder set briefly, a mortar and pestle, or by pulsing in a blender. You want coarse chunks, not fine powder—the coarse texture makes a great bark. Measure 1/3 cup coarse kosher salt and 1/3 cup coarsely cracked black pepper and mix thoroughly. If you add powdered spices, mix them in evenly.
Application method: how much rub coverage and how to apply for an even bark
Apply the binder, then liberally coat the brisket with the rub so there’s an even, visible layer—don’t worry about it being heavy. Aim for full coverage on all exposed surfaces. For a 10–14 lb brisket you’ll typically use the full 1/3 cup salt + 1/3 cup pepper mixture; press the rub in with your hands so it adheres.
Timing: whether to apply rub immediately before smoke or allow a short rest for cure
You can apply the rub and let the brisket rest refrigerated for 1–4 hours to allow flavors to adhere and a light cure to occur; however, many pitmasters also put it directly on the smoker after applying. If you rest it in the fridge, remove it 30–60 minutes before going on the smoker to come closer to ambient temperature for even cooking.
Alternative seasoning ideas and variations to recommend in the article
If you want variation, try adding 1–2 tbsp garlic powder and onion powder to the salt-and-pepper base, or 1–2 tbsp smoked paprika for color. For a pepper-forward crust, increase coarse black pepper. For a sweeter profile, add 1–2 tbsp brown sugar (but monitor for burning). Use these variations sparingly to maintain the brisket’s beef-forward character.
Pre-Smoke Holding and Temperature of Meat
Brisket temperature considerations before it goes on the smoker and why they matter
You don’t need to bring brisket to room temperature like smaller cuts, but removing it from refrigeration 30–60 minutes before smoking helps avoid a very cold core that prolongs the initial cook phase. That said, you also don’t want it warm for too long for food safety. A brief rest at room temp (under an hour) is fine.
Recommended resting time after trimming and seasoning to let flavors set (describe in final article)
After trimming and seasoning, rest the brisket in the refrigerator for 1–4 hours if you want the rub to set and dry slightly—this helps the bark formation. If you’re short on time, a 30–60 minute bench rest at room temp is adequate before smoking.
Tips for handling brisket in hot or cold weather prior to smoking
In hot weather, keep the brisket refrigerated as long as possible to prevent bacterial growth; minimize time at ambient temperature. In cold weather, protect the brisket from temperatures below freezing by keeping it in the insulated cooler until shortly before the smoke. Always maintain food-safe temperatures.
How to transport the brisket to the smoker and final checks before placing on heat
Transport in a cooler if you’re moving the brisket any distance. Just before placing it on the smoker, pat the surface dry with paper towels if needed, apply any last-minute rub touch-ups, and check that your smoker is stable at the target temperature with good airflow and wood supply.
Safety and cross-contamination precautions during pre-smoke handling
Use clean utensils and cutting boards, sanitize surfaces after trimming, and never reuse plates that held raw brisket for finished meat unless they’ve been sanitized. Keep a dedicated probe thermometer that you sanitize between uses.
This image is property of pixabay.com.
Smoking Process and Heat Management
Overall smoking timeline outline to expand into step-by-step instructions in the final recipe
Set smoker to 225°F (107°C) as your baseline. Plan for roughly 1–1.25 hours per pound, but always rely on internal temp and probe tenderness rather than time alone—expect 10–15+ hours for a whole packer. Start with unwrapped smoking until the bark sets and the brisket enters the stall, then wrap or continue unwrapped based on your chosen method.
Target smoke flavor profile: wood selection and how it influences flavor (to be specified in recipe)
Aim for a mild to moderate smoke: post oak or oak provides classic, balanced smoke without bitterness. Hickory adds smokier, bacon-like notes and is fine in moderation. Avoid heavy continuous mesquite for the full cook unless you specifically want an intense flavor; too much strong smoke can become acrid over a long cook.
Managing consistent low-and-slow heat and how this affects brisket texture
A consistent 225–250°F (107–121°C) keeps collagen breaking down slowly into gelatin, producing tender, juicy brisket. Fluctuating temps can lengthen cook time and affect bark. Monitor fuel and vents and make small adjustments rather than large swings.
Smoke application: controlling smoke intensity and avoiding acrid flavors
Aim for thin, bluish smoke during the initial hours—avoid thick white smoke. Use small, frequent wood additions rather than large chunks that smolder. If you get acrid, bitter smoke (thick white or black smoke), increase airflow or reduce wet wood.
Monitoring progress: use of thermometers and visual cues (bark development, color, and smoke ring)
Use an accurate leave-in probe thermometer in the thickest part of the flat (not touching fat or bone). Look for a dark mahogany bark, not overly black. A pink smoke ring will form near the surface early on; visual cues plus internal temp and probe tenderness guide you more than a clock.
Understanding and Handling the Stall
Explain what the stall is and why it occurs during brisket smoking
The stall is when internal temperature plateaus—usually around 150–165°F—because evaporative cooling from surface moisture offsets heat input. This can last several hours and is normal during long brisket cooks.
Options to handle the stall to be described in the final article: wait it out, wrap (Texas crutch), or adjust temperature
You have three main options: 1) Wait it out and keep smoking unwrapped for a firmer bark and slightly longer cook; 2) Wrap the brisket (in butcher paper or foil) to reduce evaporation and push through the stall faster (the Texas crutch); 3) Increase smoker temperature slightly (to 250–275°F) to shorten the stall, accepting some tradeoffs in bark. Choose based on your schedule and desired bark.
When and how to wrap: types of wrap materials and benefits/tradeoffs
Wrap when internal temps enter the stall or when the bark has set (roughly 150–165°F). Use pink butcher paper for better breathability—this preserves bark texture while speeding the cook—or heavy-duty aluminum foil for fastest heat conduction and maximum moisture retention (resulting in softer bark). Wrap tightly to reduce surface moisture loss and return to smoker seam-side up.
How wrapping affects cook time, bark, and moisture retention
Wrapping usually shortens remaining cook time by several hours and increases moisture retention, giving a softer bark and more tender result sooner. Unwrapped brisket will take longer and have a firmer, drier bark. Butcher paper is the middle ground: retains moisture while keeping some bark chew.
How to document and time the stall stage for recipe accuracy
Note the time when the brisket first reaches the stall temperature range and when you wrap or when the temp begins rising again—that lets you document how long the stall lasted under your conditions. This is valuable for refining timing on future cooks.
This image is property of pixabay.com.
Finishing the Cook: Internal Temperature and Tenderness
Key doneness cues beyond temperature: probe test for tenderness and feel
Doneness is best judged by how the probe slides into the meat: you want the probe to enter like softened butter with moderate resistance—this “probe-tender” feel is more reliable than a single temp. The meat should also feel pillowy and the point should be notably tender.
How to reconcile internal temperature readings with probe-tender results in the final recipe
Use temperature as a guideline—many briskets reach probe tenderness around 200–205°F. If your brisket reaches 203°F but resists the probe, continue cooking; if it probes tender at 198°F, you can stop. Don’t rely solely on a number.
Finishing steps to achieve proper bark and internal texture
If the bark is too soft after wrapping and you want firmer bark, unwrap the brisket for the last 30–60 minutes and raise smoker temp slightly (to 275°F) to set and dry the surface. Conversely, keep wrapped until probe-tender if moisture is the priority.
When to remove from smoke vs continue cooking: decision points to explain
Remove the brisket from the smoker when it is probe-tender and at or near your target internal temperature (typically 200–205°F), unless you have observed a consistent earlier tenderness in your pit. If the flat is tender before the point, rely on the toughest area (usually the point) as your guide.
Resting plan after removal to carryover cook and redistribute juices
After removing, leave the brisket wrapped and let it rest for at least 1 hour and up to 2 hours in a cooler or insulated environment to allow carryover cooking and redistribution of juices. For large packers, 1.5–2 hours is ideal. Carryover will often raise internal temp a few degrees.
Resting, Slicing, and Presentation
Proper resting technique and duration to maximize juiciness and tenderness
Rest wrapped brisket in a cooler or insulated container lined with towels to keep warm. Rest for 1–2 hours depending on size. Avoid cutting too early—slicing right away will bleed juices onto the cutting board.
Whether to leave brisket wrapped during resting and best practices for carryover heat control
Keep it wrapped until you’re ready to slice. Use butcher paper or foil for wrapping and place the wrapped brisket in an insulated cooler. If you desire a crisper bark when slicing, open the wrap for the last 15–20 minutes of rest to let the surface dry slightly.
How to separate point from flat and proper slicing orientation across the grain
To separate, identify where the point tapers into the flat—there’s often a seam of fat. Slice along the seam to separate the two muscles. Slice both across the grain: the flat’s grain runs lengthwise so slice perpendicular to those fibers. The point’s grain is often different, so rotate as needed to slice across the grain for tender pieces.
Slicing thickness recommendations and tips to keep slices intact
Slice about 1/4 inch to 3/8 inch thick for the flat for neat slices; you can slice the point a bit thicker if serving chopped or piled. Use a long, sharp slicing knife and a gentle sawing motion; keep slices even and avoid smashing. Rested brisket slices hold together better.
Presentation tips for plates, butcher paper, or serving trays and preserving bark
Present slices with the bark side up to show contrast and texture. For a classic Texas look, serve on butcher paper or a wooden cutting board with brisket trimmed into clean slices next to chopped point. If you’re serving a crowd, arrange whole slices on a tray with bark intact and juices (mojo or au jus) in a gravy boat on the side to preserve texture.
Conclusion
Recap of the essential steps to make Texas smoked brisket properly and what readers should focus on
To make Texas smoked brisket properly: pick a well-marbled whole packer, trim to even thickness while leaving a protective fat cap, apply a generous salt-and-pepper rub (with optional additions), smoke low and slow at 225–250°F with mild hardwood like post oak, handle the stall by wrapping or waiting it out, finish when the brisket is probe-tender (around 200–205°F typically), and rest well before slicing across the grain.
Final encouragement about patience, practice, and tasting to refine technique
Be patient—the cook can take most of a day, and practice refines your instincts. Each brisket and smoker behave slightly differently; taste, note what worked, and adjust timing, wood, and rubs next time.
Prompt for readers to consult the full recipe for exact ingredient measurements, precise temperatures, and timed instructions
Use the ingredient list and timing guides provided here for your cook: 225°F baseline, coarse salt and pepper rub (1/3 cup each for a 10–14 lb packer), wrap during the stall if desired, finish when probe-tender. Follow these specifics for consistent results.
Suggestion to document results and iterate on rubs, wood selection, and cook methods
Keep notes about brisket weight, smoker temp, wood used, wrap time, stall duration, final temp, and probe feel. Documenting results helps you iterate on rubs, wood blends, and wrapping strategies to dial in your perfect brisket.
Invitation to share outcomes or questions and to try recommended variations
Try the simple salt-and-pepper baseline first, then experiment with optional spices, different oak/hickory blends, or butcher paper vs. foil wrapping. Share your results, timing, and questions so you can refine technique—brisket mastery comes from experience, and you’ll get better with every cook.

