In “Offset Smoker Basic Guide for Beginners” you’ll get clear, beginner-friendly guidance to fire up, control, and maintain an offset smoker so your cooks become more consistent and enjoyable. This short guide matters because solid fundamentals—like managing heat, controlling smoke, and routine maintenance—save time and prevent common mistakes.
You’ll find step-by-step startup and troubleshooting tips, plain-language explanations of key concepts such as good versus bad smoke and vent control, practical cleaning and maintenance routines, and safety best practices to keep you and your gear protected. Follow the steps and safety advice to build confidence with your offset smoker and enjoy more successful smoking sessions.
Offset Smoker Overview and Parts
Purpose of this guide and who it helps
This guide is designed to get you comfortable with offset smokers, from basic parts and setup to lighting, temperature control, smoke management, and routine maintenance. If you’re brand new to offset smoking or you’ve watched a few videos and want a clear, step-by-step reference, this will help you avoid common beginner mistakes and build confidence. You’ll find practical tips whether you own a freestanding offset like the Kingsford Stockade-style models or a DIY barrel smoker.
How offset smokers work: heat and smoke flow basics
Offset smokers use a separate firebox to generate heat and smoke that travel horizontally into the cooking chamber, passing over the food before exiting through a chimney or stack. Heat flows from the firebox into the main chamber, warming the cooking surface; smoke carries flavor compounds that impregnate the food’s surface. The goal is to manage the fire and airflow so you get steady indirect heat and clean, thin smoke that enhances flavor without producing bitterness.
Main components: firebox, cooking chamber, chimney, grates, dampers, ash pan
An offset smoker has a few key parts you’ll learn to recognize and use: the firebox holds the fuel and ash; the cooking chamber is where you place grates and your food; the chimney provides exhaust and draft control; grates support the food and warming racks hold smaller items; dampers or vents control intake and exhaust airflow; and an ash pan or ash collection area makes cleanup easier. Each component affects temperature, smoke flow, and ease of maintenance, so understanding their roles helps you troubleshoot and tune your smoker.
How offset smokers differ from vertical or pellet smokers
Offset smokers produce heat and smoke from a side firebox, creating a horizontal flow that mimics traditional pit smoking. Vertical smokers concentrate heat below the food and rely on convection within a tall chamber, while pellet smokers automate fuel feed and thermostat control using wood pellets and an auger. Offsets give you direct control of the fire and a classic smoke flavor profile, but they demand more active fire management and skill to maintain steady temps compared with the more automated pellet units or the compact, space-efficient vertical smokers.
Key model features to look for (example: Kingsford Stockade attributes)
When evaluating offset smokers, look for sturdy construction, well-fitting lids, robust firebox capacity, adjustable dampers, a reliable grease management system, and decent cooking surface area. For example, features like a counterbalance lid, grease collection pan and bucket, smoke locks or gaskets to reduce leakage, a large offset firebox for logs, porcelain-coated grates, and locking casters make setup, maintenance, and long cooks easier. Those attributes, similar to what you’d find on models like the Kingsford Stockade, help you spend less time fighting leaks and more time learning fire control.
Tools and Accessories You Need
Essential hand tools: heat-resistant gloves, long-handled tongs, spatula
You should have heat-resistant gloves that let you move hot grates and logs safely, long-handled tongs for repositioning coals or food, and a sturdy spatula for flipping items near the cooking surface. These basic hand tools protect you from burns and give you the reach and control needed to work comfortably around high heat.
Fire and fuel tools: charcoal chimney starter, fire pokers, ash shovel
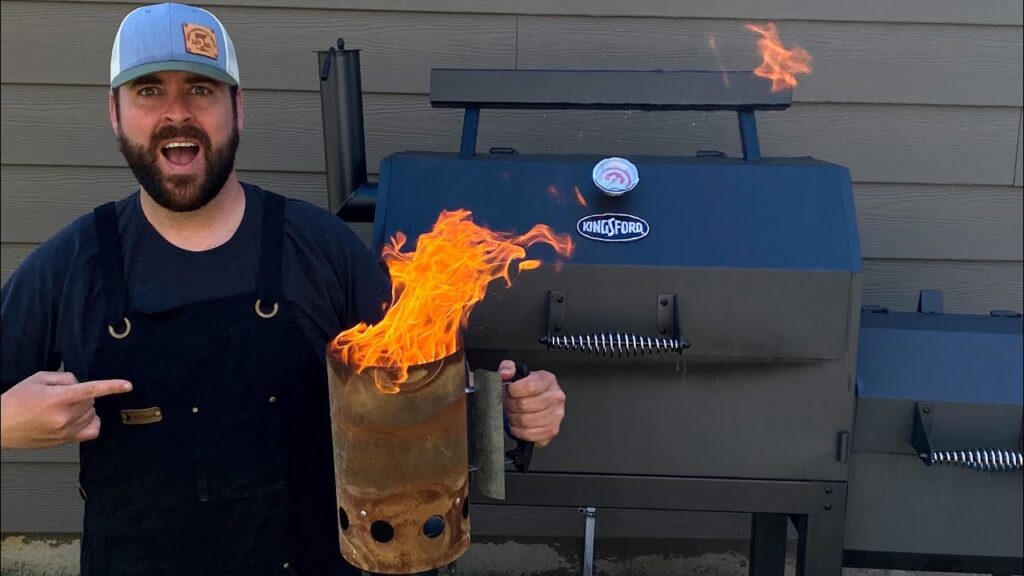
A charcoal chimney starter makes lighting lump or briquette charcoal faster and cleaner without lighter fluid. Metal fire pokers and tongs help you manage coals and wood placement in the firebox, and an ash shovel or scoop keeps the ash pan tidy so airflow remains consistent. These tools are essential for efficient fire management and safer operation.
Monitoring gear: probe thermometers (single and multi-probe like Inkbird), lid thermometer placement
Reliable temperature monitoring is critical. A quality probe thermometer or multi-probe unit (brands like Inkbird are commonly used) lets you track food temps and chamber temperatures at once. Be aware that the built-in lid thermometer on many smokers sits high and reads hotter than the cooking surface; place probes at grate level near the food for accurate readings and use the lid thermometer as a rough reference.
Optional helpful accessories: water pans, deflectors, rib racks, grill mats, casters
Water pans stabilize temperature and add humidity during long cooks, while deflectors or baffles help even out direct heat and protect food from hotspots. Rib racks increase capacity without crowding grates, grill mats keep delicate items from falling through, and casters make heavy smokers mobile. These extras are optional but can make multi-hour sessions easier and more consistent.
Recording and lighting tools: phone tripod for timelapse, rechargeable torch, battery lighters
If you want to document cooks or review technique, a phone tripod for time-lapse videos is handy. For lighting the fire and performing quick spot burns, a good rechargeable torch and battery lighters are convenient, especially in wind or damp conditions. Keep a rechargeable torch and a backup lighter handy for both safety and convenience.

This image is property of i.ytimg.com.
Selecting and Arranging Fuel
Differences between lump charcoal, briquettes, and wood logs
Lump charcoal lights quickly, burns hotter, and produces less ash, making it great for quick temperature changes and clean heat. Briquettes burn more consistently and longer, producing steady heat and predictable results. Wood logs add strong, natural smoke flavor and long burn times but require more management to maintain steady temps. Choose your fuel based on how much control you want and how long you intend to run the smoker.
Choosing wood types and flavors without naming recipes — mild vs strong woods
Woods vary from mild and fruity to bold and smoky. Mild woods produce subtle, sweet smoke that won’t overpower delicate proteins; stronger woods give pronounced, savory smoke best suited to robust cuts. Match wood intensity to the size and duration of your cook, leaning toward milder woods for long, delicate cooks and stronger woods for short bursts or heavy meats that can stand up to bolder smoke.
How to combine charcoal and wood for long burns
For long burns you’ll often combine charcoal for stable, long-lasting heat with wood chunks or logs for flavor. Start with a bed of lit charcoal to provide consistent heat, and add wood chunks so they smolder rather than burn fiercely—this produces thin, flavorful smoke. For very long sessions consider a “minion” style setup where a small amount of lit charcoal starts a larger bank of unlit briquettes or lump, reducing the need for frequent refueling.
Fuel arrangement strategies for temperature control: snake, minion, banked coals, log orientation
There are several fuel arrangements you can use to control temperature. The snake and minion methods are popular for long, consistent burns: the snake places coals in a curved line so they ignite progressively; the minion stacks unlit fuel with a small lit starter to burn slowly. Banking coals concentrates heat for higher temps, and orienting logs parallel or perpendicular to airflow influences how quickly they burn. Choose an arrangement that matches the duration and steady-state temp you need.
Managing fuel for long cooks vs short cooks
For short cooks, use fewer coals and a few wood chunks for quick flavor and easy temp adjustments. For long cooks, build a larger fuel reserve with briquettes or stacked lump and add whole logs or chunks spaced to maintain smoke. Long cooks require planning—preheat a strong fire, stabilize temp, and only add small amounts of fuel to avoid large temperature swings. The trick is incremental additions and thoughtful placement to keep the heat consistent.
Assembly, Seals, and Initial Setup
Reading the manual and checking parts before first use
Before assembly, read the manual thoroughly and inventory all parts. Confirm welds, hinges, bolts, and any gaskets are present and intact. Familiarizing yourself with the assembly steps and the part names will save time and prevent mistakes during setup.
Assembly tips and common pitfalls to avoid
Assemble on a flat, stable surface and avoid overtightening bolts that could strip threads or warp metal. Pay special attention to the orientation of the firebox, chimney, and damper hardware. Common pitfalls include reversed parts, skipped washers, or installing the chimney too loosely—these lead to poor draft or smoke leakage later.
Checking and improving seals: smoke locks, gaskets, and door alignment
Check door alignment and gasket condition to minimize smoke and heat loss. Many offset smokers have smoke locks, lips, or gasket channels—ensure these surfaces mate tightly. If gaps exist, add high-temperature gasket tape or adjust hinges so doors close squarely. Better seals improve fuel efficiency and make temp control easier.
Leveling and placing the smoker for proper drainage and airflow
Place the smoker on level ground to ensure even cooking and proper grease drainage. Slight slope toward the grease drain is helpful if your model uses a grease bucket. Position the firebox upwind or sheltered from strong crosswinds to steady draft, but keep clearance from combustibles and structures for safety.
First-time burn-in and seasoning objectives without cooking food (burn off and paint cure)
Before cooking food, do a burn-in to cure paint, burn away manufacturing residues, and check airflow and seals. Light the smoker and bring it to moderate temps for a couple hours with the lid closed, monitoring for odd smells or excessive smoke. This process helps set gaskets and bakes protective oils into the metal and interior surfaces—don’t skip it.

This image is property of pixabay.com.
Step-by-Step: How to Fire Up an Offset Smoker
Preparing the firebox: ash removal and grate positioning
Start by clearing old ash and ensuring the firebox grate sits level and unobstructed. Excess ash chokes airflow, so clean to the ash pan line. Position the grate so coals sit under the firebox opening toward the cooking chamber for good heat transfer.
Using a chimney starter step-by-step to light charcoal safely
Fill a charcoal chimney with lump or briquettes, place crumpled firestarter or natural starter cubes under the chimney, and ignite them. Let the charcoal ash over—usually 10–20 minutes—so it’s uniformly glowing before transferring. The chimney starter gives you a concentrated, hot bed of coals without lighter fluid.
Transferring coals and adding wood chunks or logs correctly
Once the coals are ready, dump them into the firebox in your chosen arrangement: banked for steady heat, a minion setup for long burns, or a concentrated pile for high heat. Nestle wood chunks among the coals for smoldering smoke rather than direct flames; place larger logs to the side or back so they burn progressively and don’t create sudden temperature spikes.
Opening and setting vents for initial draft
Open the intake vents on the firebox and the exhaust damper on the chimney to establish the initial draft. For a clean start, have intake partially open and exhaust wide enough to draw smoke through the cooking chamber. You’ll fine-tune vents as the smoker approaches your target temperature.
Stabilizing temperature before introducing any food or probes (targeting steady temp)
Bring the chamber to your target temperature and let it stabilize for 10–20 minutes before adding food or delicate probes. Watch for consistent readings from your grate-level probe, and adjust intake for more oxygen or close it slightly to calm the fire. Only when the temp is steady should you begin the cook.
Temperature Control and Vent Management
How vents affect oxygen and temperature: intake vs exhaust roles
Intake vents control the oxygen feeding the fire—opening them increases oxygen and raises temps; closing them reduces oxygen and cools the fire. The exhaust (chimney) controls how quickly smoke and heat exit; too closed and you choke the fire, too open and you may lose too much heat. Think of intake as the throttle and exhaust as the path—both need balancing for a stable burn.
Placing and calibrating thermometers and probes for accurate readings
Place your main chamber probe at grate level where the food will sit to get an accurate cooking-zone reading. Use a separate probe for the firebox if you want to monitor source heat. Calibrate thermometers periodically by checking boiling water or ice bath temperatures to confirm accuracy and offset readings as needed.
Techniques for raising, lowering, and stabilizing temperature
To raise temperature, increase intake airflow or add fresh hot coals; to lower it, reduce intake, close the damper slightly, or move coals away from the firebox-to-chamber opening. Stabilize by making small adjustments and waiting 10–15 minutes to see the effect; sudden large changes tend to overshoot and create swings.
Using fuel or vent adjustments when temperature drifts
If the temp drifts up, back off the intake or move coals to the perimeter of the firebox; if it drifts down, add a few lit coals or open intake slightly. When adding fuel mid-cook, place it so you don’t vent all heat at once—add gradually and protect the chamber by opening the firebox briefly rather than leaving it open.
When and how to use water pans, deflectors, or baffles to smooth temps
Use a water pan when you need extra thermal mass and humidity to reduce temperature swings and preserve moisture in long cooks. Deflectors and baffles redirect heat away from direct flame and even out hot spots. Position these tools between the firebox and food to smooth the cooking environment and reduce the need for constant vent tweaks.

This image is property of pixabay.com.
Smoke Management and Key Concepts
Good smoke vs bad smoke: color, density, and flavor implications
Good smoke is thin and blue-gray, indicating clean combustion and subtle flavor transfer. Bad smoke is thick, white or black, and billows heavily—signs of incomplete combustion that can deposit bitter, sooty creosote on food. Aim for a steady, gentle blue smoke for the best results.
How to recognize creosote and how to avoid bitter flavors
Creosote appears as a sticky, tar-like black residue and yields harsh, bitter flavors on food. Avoid creosote by using dry, well-seasoned wood, ensuring good airflow, and preventing smoldering flames. If you see dark, heavy smoke, open the intake briefly to encourage cleaner combustion or remove wet fuel.
Controlling smoke intensity through fuel choice and airflow
Milder woods and smaller wood chunks produce lighter smoke; larger logs and heavy bark can make smoke dense. Adjust airflow to encourage cleaner burn—more oxygen usually thins smoke and increases combustion efficiency. Balance fuel type and venting to control how pronounced the smoke character is.
Understanding smoke windows and optimal smoke exposure duration
Most desirable smoke flavor accumulates during the first several hours of a low-and-slow cook—the “smoke window.” After that, prolonged smoke exposure can lead to bitter notes. You don’t need constant heavy smoke; short, steady amounts of thin smoke during the smoke window are usually enough to impart flavor.
How smoke interacts with temperature to create desired results
Smoke compounds bind to food surfaces better at moderate temperatures. If your smoker is too cool, you’ll get heavy smoke buildup; too hot and volatile compounds may dissipate without bonding. Aim for a steady temperature appropriate for the cut you’re cooking so smoke and heat work together to create the desired color and flavor.
Daily Workflow: Preparing for a Cook
Planning the cook and timing your fire build
Work backward from your desired serve time: decide how long the cook should run, then schedule your fire build to allow preheating and stabilization. For long cooks, start the fire earlier to confirm stable temps; for shorter sessions, a shorter build time is fine. Planning reduces stress and helps you make smarter fuel and equipment choices.
Checklist before lighting: tools, fuel, thermometer calibration, safety items
Before you light, check that you have gloves, tongs, chimney starter, extra fuel, probes, a charged torch or lighter, fire extinguisher or water source, and that your thermometers are calibrated. Confirm ventilation is clear and that the smoker is placed a safe distance from structures. A quick checklist prevents mid-cook scrambling.
Step-by-step setup for a typical low-and-slow session
Set the smoker level and clean ash from previous cooks, prepare a chimney of coals, light and wait for ash-over, transfer coals into your chosen arrangement, nestle wood chunks, open vents to establish draft, place a water pan or deflector if using, insert probes at grate level, close the lid and stabilize temperature before adding food. Monitor until the smoker holds the target temperature.
How to monitor and log temperatures and adjustments during a cook
Monitor both the chamber probe and food probes, logging temperature readings and notable adjustments (time of adding fuel, vent changes). Simple notes help you learn how your smoker responds over time. Check probes every 30–60 minutes during critical periods and less often during long steady-state sections, unless you suspect an issue.
When to add fuel or wood and how to do so with minimal heat loss
Add fuel when you see a gradual temperature decline or when the planned fuel profile requires it. Use hot coals or small lit batches so you don’t dump cold fuel and lose heat. Open the firebox only briefly, add fuel to the back or side away from the cooking chamber, and close the door promptly to minimize heat loss.

This image is property of pixabay.com.
Maintenance and Cleaning Routines
Daily or post-cook tasks: ash removal, grate brushing, grease pan emptying
After each cook, let the smoker cool safely, then remove excess ash to keep airflow clear, brush grates while still slightly warm to remove residue, and empty grease pans or buckets to prevent buildup and pest attraction. Regularly doing these tasks makes future cooks simpler and safer.
Weekly and monthly checks: rust spots, seals, and hardware tightness
Weekly checks should include scanning for rust, inspecting gaskets and door alignment, and tightening bolts or hardware that may loosen with heat cycles. Treat small rust spots quickly and replace worn gaskets to maintain efficiency and reduce smoke leakage.
Deep cleaning: removing baffles, degreasing, and re-coating if needed
Periodically perform a deep clean by removing baffles, racks, and plates to degrease interior surfaces with a high-heat-safe cleaner or degreaser, scrubbing and rinsing thoroughly. If the interior or exterior paint is flaking, consider high-temp touch-ups to protect from corrosion. Reassemble carefully, ensuring all seals and fasteners are secure.
Grease management system care and proper disposal of grease and ash
Empty grease collection pans and buckets regularly and clean them to prevent clogs and fire hazards. Dispose of grease and ash responsibly once fully cooled—use metal containers for ash and avoid dumping hot ash into trash. Proper disposal prevents accidental fires and prolongs the life of your grease-management components.
Preventative maintenance to extend smoker life (paint touch-ups, lubrication)
Perform preventative tasks like touching up high-temp paint where needed, sanding small rust patches, and lubricating moving parts like hinges with high-temp-safe lubricants. Keeping caster wheels, handles, and dampers functional reduces stress on the smoker and preserves performance over time.
Conclusion
Recap of essential setup, safety, and operational steps
You’ve learned how offset smokers work, the main parts to know, the key tools and fuels, and how to assemble, light, and stabilize your smoker. Keeping vents balanced, using accurate probes at grate level, and choosing appropriate fuel strategies are central to consistent results. Safety basics—clearances, fire control tools, and careful fuel handling—are non-negotiable.
Encouragement to practice skills and keep maintenance routines
Skill with an offset smoker grows through practice; each cook teaches you about your smoker’s quirks and response to wind, fuel, and weather. Keep a log, perform consistent maintenance, and you’ll reduce surprises and build reliable techniques that make your cooks fun and repeatable.
Final safety reminders and best-practice habits to build confidence
Always work on stable, non-combustible ground, keep a fire extinguisher nearby, use proper protective gear, and avoid leaving a hot smoker unattended. Make small adjustments and wait to observe their effects—rapid, large changes often cause problems. These habits keep you safe and in control.
Suggested next steps for skill progression and where to find more help
Next, practice different fuel arrangements and vent adjustments on short test burns to see how your smoker responds, and experiment with park-and-hold techniques for longer sessions. Join owner groups or forums for your specific model to learn modifications and troubleshooting tips from experienced users. With time and methodical practice you’ll move from nervous beginner to a confident offset smoker operator.
